Loose Floor Mats: Difference between revisions
Created page with "== Service Bulletin A00-050: Loose Accessory Floor Mat Anchor in 2000 Honda S2000 == === Introduction === This article details the Service Bulletin A00-050, issued by American Honda Motor Co., Inc., addressing a specific issue with the accessory floor mat anchor in the 2000 Honda S2000. The bulletin provides a solution for the loose driver’s floor mat anchor, which can move side to side due to its pivot on the mounting screw. === Symptom === * '''Problem Identified''..." |
No edit summary |
||
| Line 33: | Line 33: | ||
## Slide the driver’s seat back to access the floor area. | ## Slide the driver’s seat back to access the floor area. | ||
## Locate the precut sections in the carpet. | ## Locate the precut sections in the carpet. | ||
[[File: | [[File:Preparation_1_A00-050.jpg|thumb|center|200px|Locate the precuts in the carpet.]] | ||
# '''Carpet Modification''': | # '''Carpet Modification''': | ||
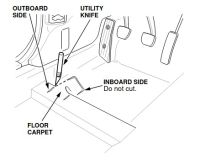
## If two small precuts are found, use a utility knife to cut through the carpet between the smaller outboard precuts. | ## If two small precuts are found, use a utility knife to cut through the carpet between the smaller outboard precuts. | ||
[[File: | [[File:Preparation_1_A00-050.jpg|thumb|center|200px|Cutting through the carpet between the smaller outboard precuts.]] | ||
# '''Removing Old Parts''': | # '''Removing Old Parts''': | ||
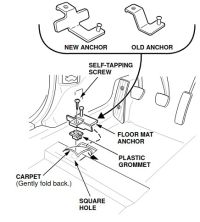
## Gently pull back the carpet flap and remove the screw, anchor, and grommet from the body crossmember. | ## Gently pull back the carpet flap and remove the screw, anchor, and grommet from the body crossmember. | ||
[[File: | [[File:Preparation_2_A00-050.jpg|thumb|center|200px|Removing the old floor mat anchor and related parts.]] | ||
# '''Installing New Parts''': | # '''Installing New Parts''': | ||
## Push the new plastic grommet into the square hole in the crossmember. | ## Push the new plastic grommet into the square hole in the crossmember. | ||
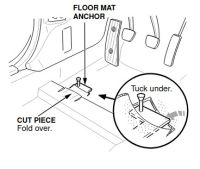
## Fold the carpet over the new anchor, tuck the edge under, and secure the anchor with the self-tapping screw. | ## Fold the carpet over the new anchor, tuck the edge under, and secure the anchor with the self-tapping screw. | ||
[[File: | [[File:Preparation_3_A00-050.jpg|thumb|center|200px|Installing the new floor mat anchor and securing it.]] | ||
# '''Final Assembly''': | # '''Final Assembly''': | ||
## Install the driver’s floor mat, ensuring the grommet fits securely over the pin. | ## Install the driver’s floor mat, ensuring the grommet fits securely over the pin. | ||
[[File: | [[File:Preparation_3_A00-050.jpg|thumb|center|200px|Final assembly of the driver’s floor mat with the new anchor.]] | ||
=== Categories === | === Categories === | ||
Revision as of 07:27, 14 August 2024
Service Bulletin A00-050: Loose Accessory Floor Mat Anchor in 2000 Honda S2000
Introduction
This article details the Service Bulletin A00-050, issued by American Honda Motor Co., Inc., addressing a specific issue with the accessory floor mat anchor in the 2000 Honda S2000. The bulletin provides a solution for the loose driver’s floor mat anchor, which can move side to side due to its pivot on the mounting screw.
Symptom
- Problem Identified: The driver’s floor mat anchor moves laterally, causing instability.
Cause
- Probable Cause: The movement is due to the floor mat anchor pivoting on the mounting screw, leading to improper securing of the floor mat.
Corrective Action
- Recommended Solution: Replace the original floor mat anchor with an improved part.
Parts Information
- Required Parts:
- Floor Mat Anchor: P/N 08P15-S2A-101R1 (H/C 6473425)
Warranty Claim Information
- In Warranty:
| Operation Number | Flat Rate Time | Defect Code | Template ID | Skill Level |
|---|---|---|---|---|
| 029105 | 0.5 hours | 049 | 00-050A | Repair Technician |
- Out of Warranty:
Any repair performed after warranty expiration may be eligible for goodwill consideration by the District Service Manager or your Zone Office. You must request consideration, and get a decision, before starting work.
Repair Procedure
- Preparation:
- Slide the driver’s seat back to access the floor area.
- Locate the precut sections in the carpet.

- Carpet Modification:
- If two small precuts are found, use a utility knife to cut through the carpet between the smaller outboard precuts.

- Removing Old Parts:
- Gently pull back the carpet flap and remove the screw, anchor, and grommet from the body crossmember.

- Installing New Parts:
- Push the new plastic grommet into the square hole in the crossmember.
- Fold the carpet over the new anchor, tuck the edge under, and secure the anchor with the self-tapping screw.

- Final Assembly:
- Install the driver’s floor mat, ensuring the grommet fits securely over the pin.

